Here’s a little overview of how one engraving is done. Of course there are many ways to achieve the same result, but this is what I use and it works for me.
This engraving was done for a DVD box that was a gift for a couple whose wedding photographer I was.
First off me and my dad brainstormed about 3 hours how to make the box. First idea was to make usual rectangular box, but we just couldn’t find a way to put the discs safely there and we definitely didn’t want to use any plastic parts for DVD holders. The problem was also that I had to fit 3 discs there. We tried to come up with a way to modify plastic boxes that hold 4 discs, but nothing was really good… Finally we came up with the simplest solution – circular tower. It was the easiest to build and probably looks most elegant too. Dad went off to build the box out and veneer it, I started to work on engraving design.
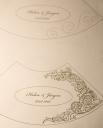
Design process usually starts with scanning the detail I want to engrave, in this case 12cm DVD disc, getting the contour lines in Photoshop and printing it out as big as possible, so I’ll have enough room to draw my scrolls and leaves. Then starts the creative process with pencil and lots and lots of eraser. I still rely heavily on the design book, it takes time and practice to learn it…
Drawing the design for this piece took about 4 hours, but I believe it will shorten as my skills improve. Fortunately this detail is symmetrical so I could draw only one side and later mirror-copy that to the other side. After drawing is finished with pencil it is redraw it with black pen, then I erase the pencil lines and the scan the drawing again.
In photoshop I copy the design to the other side, enhance levels and whatnot, mirror the whole design, resize to correct size and print out several copies with laser printer so they can be transferred to the piece. Transferring is done with acetone on damp paper towel – I place the design face down (hence the mirroring in PS) on the metal plate and apply acetone to the backside. This effectively melts the toner on the paper and transfers it to the metal. On this photo the right side is already cut and left side shows toner marks.
After the main lines are engraved it’s ready for shading and background treatment, both are very time consuming. Shading means just adding lots and lots of fine lines to the leaves that will give 3D look. For this project the background was stippled, which means just ‘destroying’ the negative space areas with needle-point tool.
Here’s the stippling tool attached to graver and the brass plate on vise:
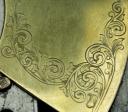
This is a close up where you can really see the shading and one part where background is already stippled:
And this is the final result:
All in all this project took about 3.5 working days to complete and I’m quite satisfied with, as was the bride who got it as gift. I’m sure I’ve never done anything that beautiful during my programming career… This all is quite satisfying.


I really like your blog and your new job!
I’ve discovered it some mounths ago and I enjoy reading it, I really like to see how you are improving day by day.
I’m a programmer too, but I’m not good at manual work, so I have to choose something else if I want to change life 🙂
I was curious…What design book is that you are using? I’m trying to find some good resources in drawing floral patterns like this. If you could let me know and I’ll hunt down that book. I’m really starting from scratch.
Your design work has been truly amazing. Thanks!
DJackson, thanks for your comment! The book I use for design is Ron Smiths “Advanced Drawing of Scrolls”, which is considered THE book of scroll design. Although it says ‘advanced’ it was IMO quite OK to start with it. Ron Smith has one beginner level design book too, called “More on Scroll Design”, which is prelude to “Advanced”, but I’ve not seen it myself.
“More on scroll design” is available from FEGA (Firearms Guild Of America) – http://fega.com/prodserv/booksSC.asp?categoryparam=book
“Advanced” book is available from GRS – http://grstools.com/b-ldd.html
FEGA had the “Advanced” book, but seems they are out of it now. I’m not sure about GRS. I’ve heard that they soon release new edition of this book (just minor fixes), but you’d have to call them and ask.
It’s quite esoteric book and you won’t get it from any major sellers or libraries. AFAIK only FEGA and GRS sell them.
Good luck!
Thanks so much, that’s exactly what I’ve been looking for.
Wow that is one RARE book. Can’t find it anywhere. I’m going to get a catalog from GRS. Is there any other places online that teach how to draw scrolls?
DJackson. Sorry that it took me so long to answer. For some reason I didn’t get a notice about a new comment.
I don’t know any online places that teach the scroll drawing per se. GRS does have ‘regular’ 1 week courses for scroll drawing. This year I think Ron Smith himself taught it.
But if you didn’t know about it, the iGraver forum (http://igraver.com/forum) is superb resource for everything related to engraving. Many worlds
Thanks! I also ordered the GRS catalog, which helps a lot.
Again, absolutely outstanding work!
The brass goes so well with the beautiful colour and marble of the wood of the box.
The engraving tool shown in the closeup .. which GRS one is it?
Ben, thanks for the kind words! The GRS tool is 901 handpiece.
This was helpful to read. Thank you for the great step-by-step and the clear pictures. Beautiful job!